Elasticsearch7.10.0集群搭建以及SpringBoot整合操作ES
Elaticsearch简称为ES,是一个开源的可扩展的分布式的全文检索引擎,它可以近乎实时的存储、检索数据。本身扩展性很好,可扩展到上百台服务器,处理PB级别的数据。ES使用Java开发并使用Lucene作为其核心来实现索引和搜索的功能,但是它通过简单的RestfulAPI和javaAPI来隐藏Lucene的复杂性,从而让全文搜索变得简单。
1.ES集群介绍
Elasticseasrch的架构遵循其基本概念:一个采用Restful API标准的高扩展性和高可用性的实时数据分析的全文搜索引擎。具有以下特性:
- 高扩展性:体现在Elasticsearch添加节点非常简单,新节点无需做复杂的配置,只要配置好集群信
息将会被集群自动发现。 - 高可用性:因为Elasticsearch是分布式的,每个节点都会有备份,所以宕机一两个节点也不会出现
问题,集群会通过备份进行自动复盘。 - 实时性:使用倒排索引来建立存储结构,搜索时常在百毫秒内就可完成。
核心概念
集群(Cluster)
一个Elasticsearch集群由多个节点(Node)组成,每个集群都有一个共同的集群名称作为标识节点(Node)
一个Elasticsearch实例即一个Node,一台机器可以有多个实例,正常使用下每个实例都应该
会部署在不同的机器上。Elasticsearch的配置文件中可以通过node.master、node.data来设
置节点类型。节点既有成为主节点的资格,又存储数据
1
2
node.master: true
node.data: true节点没有成为主节点的资格,不参与选举,只会存储数据
1
2
node.master: false
node.data: true不会成为主节点,也不会存储数据,主要是针对海量请求的时候可以进行负载均衡
1
2
node.master: false
node.data: false
分片
每个索引有1个或多个分片,每个分片存储不同的数据。分片可分为主分片(primary
shard)和复制分片(replica shard),复制分片是主分片的拷贝。默认每个主分片有一个复
制分片,每个索引的复制分片的数量可以动态地调整,复制分片从不与它的主分片在同一个
节点上副本
这里指主分片的副本分片(主分片的拷贝)
- 提高恢复能力:当主分片挂掉时,某个复制分片可以变成主分片
- 提高性能:get 和 search 请求既可以由主分片又可以由复制分片处理
2.ES集群搭建
2.1 集群规划
这里使用四台虚拟机搭建ES集群。
系统版本: Centos7.5
JDK版本: jdk11
ES版本:7.10.0
Kibana版本: 7.10.1
| 主机名 | 服务器IP | 是否主节点 | 是否数据节点 |
|---|---|---|---|
| node1 | 192.168.1.161 | 是 | 是 |
| node2 | 192.168.1.162 | 是 | 是 |
| node3 | 192.168.1.163 | 是 | 是 |
| node4 | 192.168.1.164 | 是 | 是 |
2.2 节点搭建
Elasticsearch下载地址:https://www.elastic.co/cn/downloads/elasticsearch
1 | ES默认不能使用root用户启动,所以要新建elasticsearch用户 |
修改node1上elasticsearch.yml配置,添加如下配置信息
vi /opt/elasticsearch/config/elasticsearch.yml
1 | cluster.name: my-es-cluster #集群名称 --- |
node2到node4配置参考node1。注意修改node.name
更多配置项参考
| 配置项 | 说明 |
|---|---|
| cluster.name | 集群名称,相同名称为一个集群 |
| node.name | 节点名称,集群模式下每个节点名称唯一 |
| node.master | 当前节点是否可以被选举为master节点,是:true、否:false |
| node.data | 当前节点是否用于存储数据,是:true、否:false |
| path.data | 索引数据存放的位置 |
| path.logs | 日志文件存放的位置 |
| bootstrap.memory_lock | 需求锁住物理内存,是:true、否:false |
| network.host | 监听地址,用于访问该es |
| http.port | es对外提供的http端口,默认 9200 |
| transport.port | 节点选举的通信端口 默认是9300 |
| discovery.seed_hosts | es7.x 之后新增的配置,写入候选主节点的设备地址,在开启服 务后可以被选为主节点 |
| cluster.initial_master_nodes | es7.x 之后新增的配置,初始化一个新的集群时需要此配置来选 举master |
| http.cors.enabled | 是否支持跨域,是:true,在使用head插件时需要此配置 |
| http.cors.allow-origin “*” | 表示支持所有域名 |
2.3启动
先使用root用户修改系统参数
1 | #1.修改/etc/sysctl.conf |
使用elasticsearch用户启动ES集群
1 | cd /opt/elasticsearch/bin |
启动完成后可以通过集群监控工具cerebro查看集群状态
3.Kibana安装
Kibana是一个基于Node.js的Elasticsearch索引库数据统计工具,可以利用Elasticsearch的聚合功能,生成各种图表,如柱形图,线状图,饼图等。而且还提供了操作Elasticsearch索引数据的控制台,并且提供了一定的API提示,非常有利于我们学习Elasticsearch的语法。
下载地址:https://www.elastic.co/cn/downloads/kibana
在node1(192.168.1.161)上安装Kibana
1 | #上传安装包kibana-7.10.1-linux-x86_64.tar.gz 到/opt目录 |
使用elasticsearch用户启动kibana
1 | su - elasticsearch |
4.安装IK分词器
下载对应版本的分词器,下载地址:https://github.com/medcl/elasticsearch-analysis-ik/releases 这里我们下载V7.10
下载完成后将elasticsearch-analysis-ik-7.10.0.zip 上传到服务器上/opt/elasticsearch下
1 | #安装分词器插件 |
5.索引操作
打开http://192.168.1.161:5601/app/dev_tools#/console
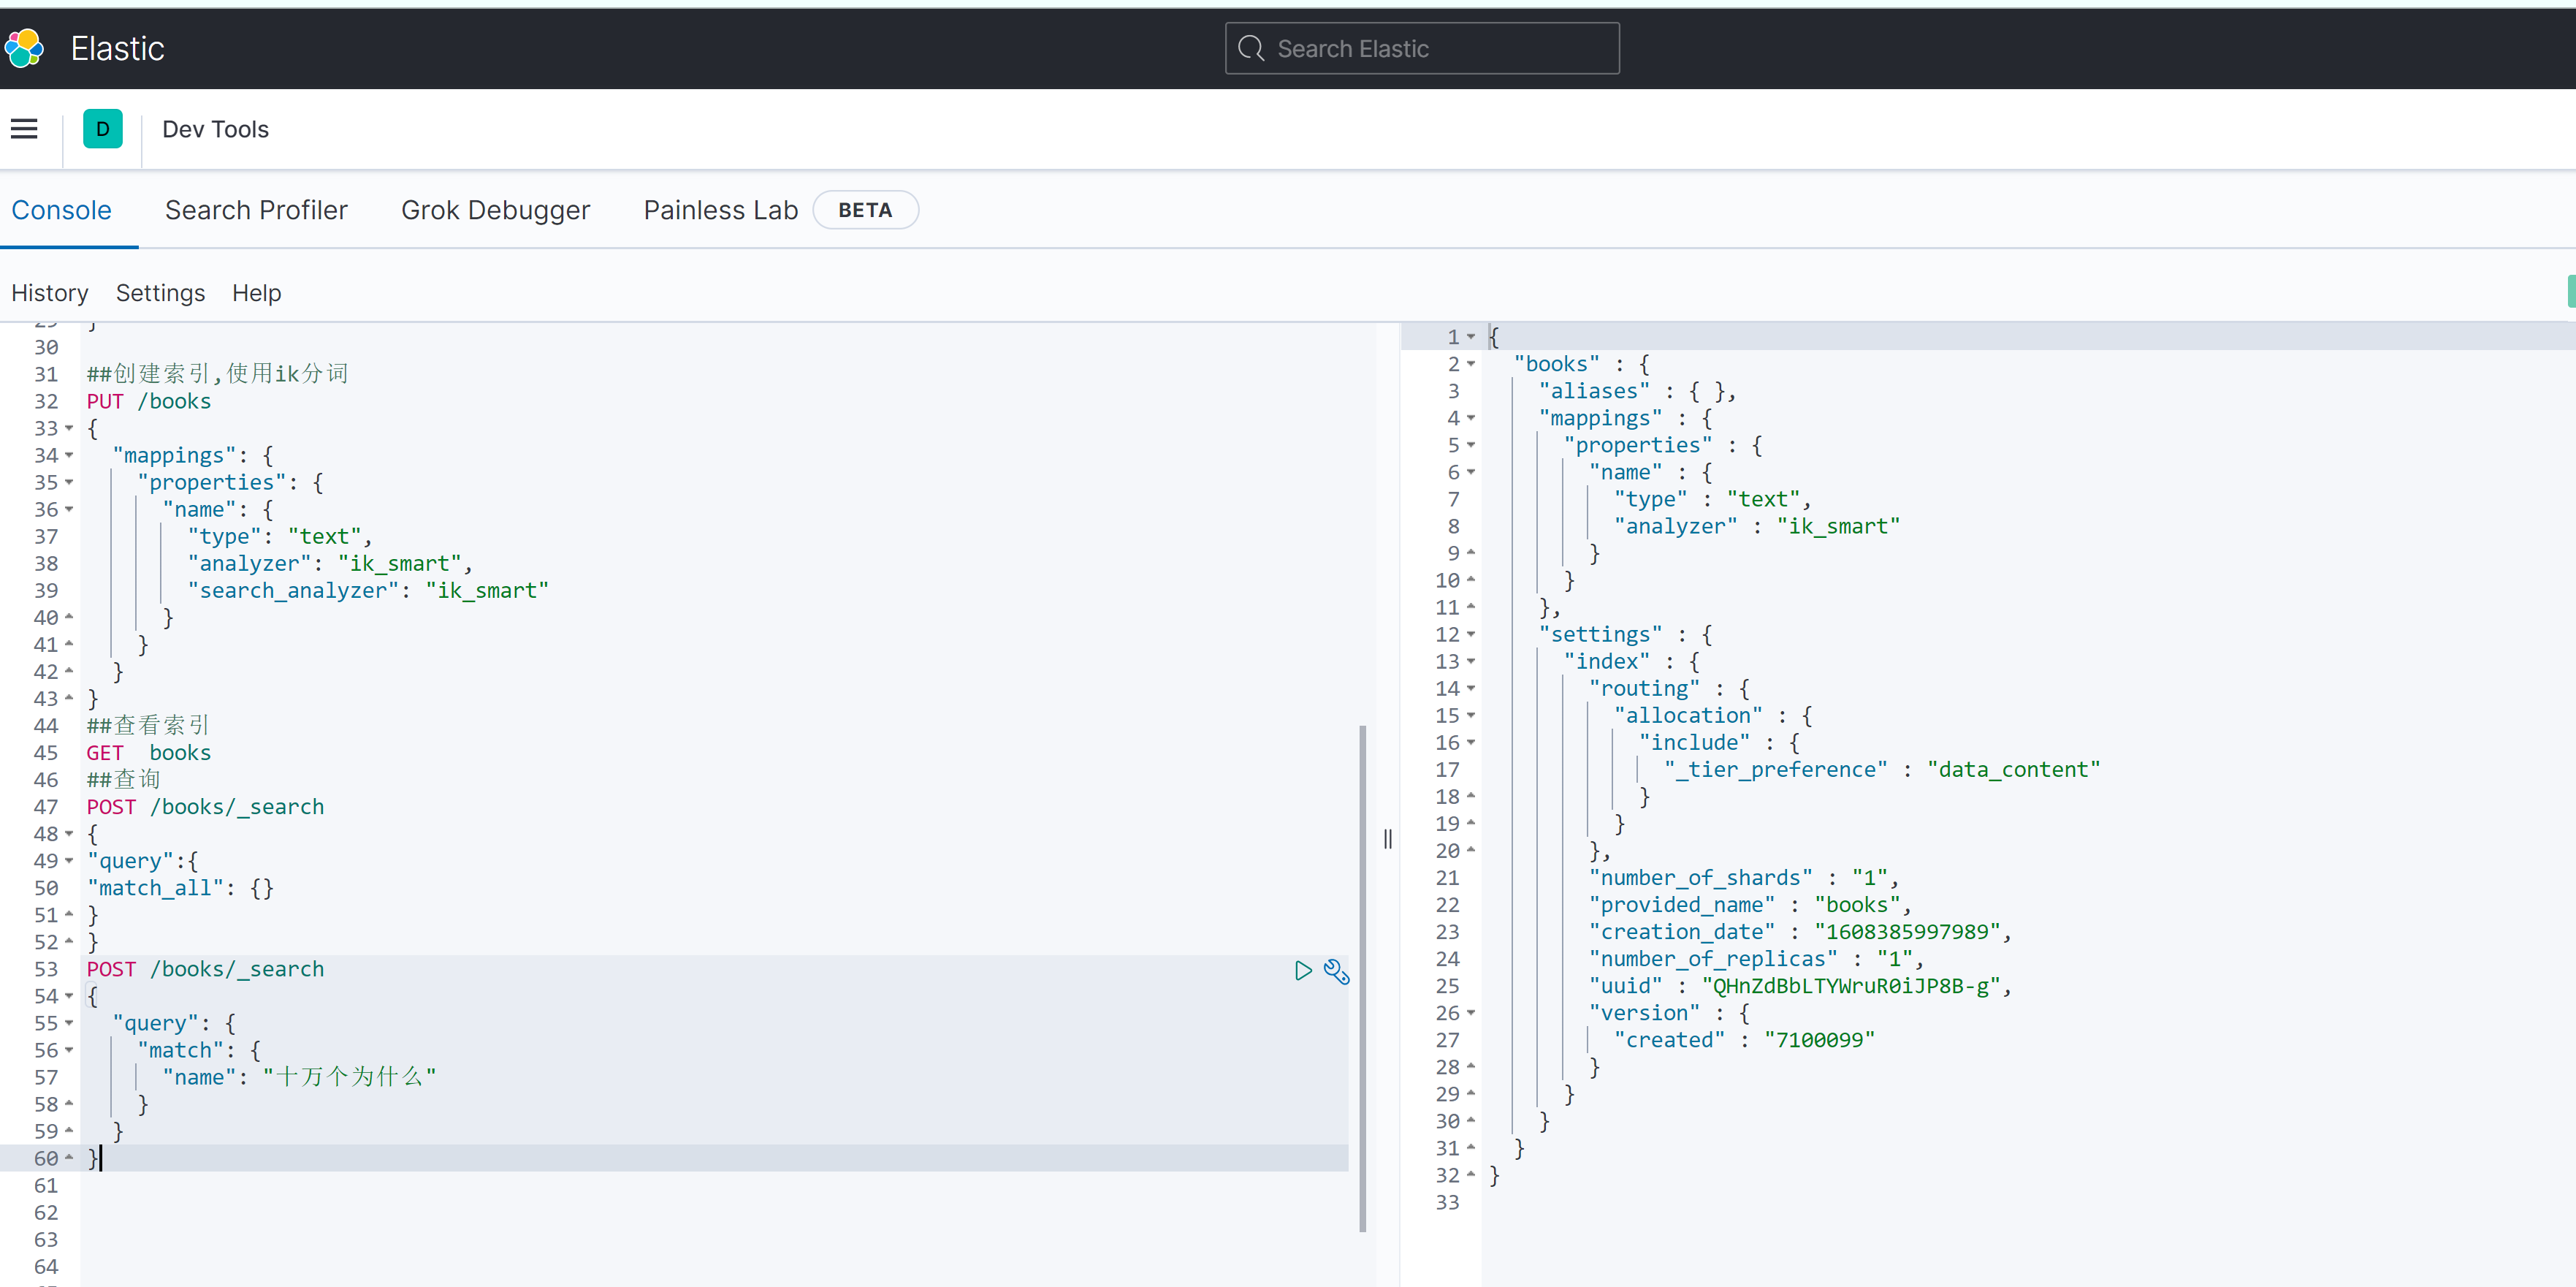
1 | ##创建索引,使用ik分词 |
6.SpringBoot整合操作Elasticsearch
ES提供多种不同的客户端:1、TransportClient ES提供的传统客户端,官方计划8.0版本删除此客户端。
2、RestClient RestClient是官方推荐使用的,它包括两种:Java Low Level REST Client和 Java High
Level REST Client。 ES在6.0之后提供 Java High Level REST Client, 两种客户端官方更推荐使用 Java
High Level REST Client, 使用时加入对应版本的依赖即可。
这里我们使用SpringBoot官方spring-boot-starter-data-elasticsearch。对应版本关系如下。
| Spring Data Release Train | Spring Data Elasticsearch | Elasticsearch | Spring Boot |
|---|---|---|---|
| 2020.0.0[1] | 4.1.x[1] | 7.9.3 | 2.4.x[1] |
| Neumann | 4.0.x | 7.6.2 | 2.3.x |
| Moore | 3.2.x | 6.8.12 | 2.2.x |
| Lovelace | 3.1.x | 6.2.2 | 2.1.x |
| Kay[2] | 3.0.x[2] | 5.5.0 | 2.0.x[2] |
| Ingalls[2] | 2.1.x[2] | 2.4.0 | 1.5.x[2] |
因为我们用的ES版本是7.10的,所以这里介绍使用最新的Spring Boot 2.4.1版本进行整合操作。
6.1引入依赖
完整的pom参考如下
1 |
|
6.2配置
application.yml配置ES连接信息如下
1 | spring: |
6.3使用
接下来就可以启动项目,操作ES了。这里可以使用以下三种方式来进行。
先创建模型
1 |
|
6.3.1.使用ElasticsearchRestTemplate
ElasticsearchRestTemplate是使用High Level REST Client的ElasticsearchOperations接口的实现。
例如:
1 |
|
6.3.2.使用ElasticsearchRepository
ElasticsearchRepository是 Spring Data ElasticSearch为我们封装好的可进行 crud、分页、排序的接口。使用方式跟我们以前使用的JPA一样。
| Keyword | Sample | Elasticsearch Query String |
|---|---|---|
And |
findByNameAndPrice |
{ "query" : { "bool" : { "must" : [ { "query_string" : { "query" : "?", "fields" : [ "name" ] } }, { "query_string" : { "query" : "?", "fields" : [ "price" ] } } ] } }} |
Or |
findByNameOrPrice |
{ "query" : { "bool" : { "should" : [ { "query_string" : { "query" : "?", "fields" : [ "name" ] } }, { "query_string" : { "query" : "?", "fields" : [ "price" ] } } ] } }} |
Is |
findByName |
{ "query" : { "bool" : { "must" : [ { "query_string" : { "query" : "?", "fields" : [ "name" ] } } ] } }} |
Not |
findByNameNot |
{ "query" : { "bool" : { "must_not" : [ { "query_string" : { "query" : "?", "fields" : [ "name" ] } } ] } }} |
Between |
findByPriceBetween |
{ "query" : { "bool" : { "must" : [ {"range" : {"price" : {"from" : ?, "to" : ?, "include_lower" : true, "include_upper" : true } } } ] } }} |
LessThan |
findByPriceLessThan |
{ "query" : { "bool" : { "must" : [ {"range" : {"price" : {"from" : null, "to" : ?, "include_lower" : true, "include_upper" : false } } } ] } }} |
LessThanEqual |
findByPriceLessThanEqual |
{ "query" : { "bool" : { "must" : [ {"range" : {"price" : {"from" : null, "to" : ?, "include_lower" : true, "include_upper" : true } } } ] } }} |
GreaterThan |
findByPriceGreaterThan |
{ "query" : { "bool" : { "must" : [ {"range" : {"price" : {"from" : ?, "to" : null, "include_lower" : false, "include_upper" : true } } } ] } }} |
GreaterThanEqual |
findByPriceGreaterThan |
{ "query" : { "bool" : { "must" : [ {"range" : {"price" : {"from" : ?, "to" : null, "include_lower" : true, "include_upper" : true } } } ] } }} |
Before |
findByPriceBefore |
{ "query" : { "bool" : { "must" : [ {"range" : {"price" : {"from" : null, "to" : ?, "include_lower" : true, "include_upper" : true } } } ] } }} |
After |
findByPriceAfter |
{ "query" : { "bool" : { "must" : [ {"range" : {"price" : {"from" : ?, "to" : null, "include_lower" : true, "include_upper" : true } } } ] } }} |
Like |
findByNameLike |
{ "query" : { "bool" : { "must" : [ { "query_string" : { "query" : "?*", "fields" : [ "name" ] }, "analyze_wildcard": true } ] } }} |
StartingWith |
findByNameStartingWith |
{ "query" : { "bool" : { "must" : [ { "query_string" : { "query" : "?*", "fields" : [ "name" ] }, "analyze_wildcard": true } ] } }} |
EndingWith |
findByNameEndingWith |
{ "query" : { "bool" : { "must" : [ { "query_string" : { "query" : "*?", "fields" : [ "name" ] }, "analyze_wildcard": true } ] } }} |
Contains/Containing |
findByNameContaining |
{ "query" : { "bool" : { "must" : [ { "query_string" : { "query" : "*?*", "fields" : [ "name" ] }, "analyze_wildcard": true } ] } }} |
In (when annotated as FieldType.Keyword) |
findByNameIn(Collection<String>names) |
{ "query" : { "bool" : { "must" : [ {"bool" : {"must" : [ {"terms" : {"name" : ["?","?"]}} ] } } ] } }} |
In |
findByNameIn(Collection<String>names) |
{ "query": {"bool": {"must": [{"query_string":{"query": "\"?\" \"?\"", "fields": ["name"]}}]}}} |
NotIn (when annotated as FieldType.Keyword) |
findByNameNotIn(Collection<String>names) |
{ "query" : { "bool" : { "must" : [ {"bool" : {"must_not" : [ {"terms" : {"name" : ["?","?"]}} ] } } ] } }} |
NotIn |
findByNameNotIn(Collection<String>names) |
{"query": {"bool": {"must": [{"query_string": {"query": "NOT(\"?\" \"?\")", "fields": ["name"]}}]}}} |
Near |
findByStoreNear |
Not Supported Yet ! |
True |
findByAvailableTrue |
{ "query" : { "bool" : { "must" : [ { "query_string" : { "query" : "true", "fields" : [ "available" ] } } ] } }} |
False |
findByAvailableFalse |
{ "query" : { "bool" : { "must" : [ { "query_string" : { "query" : "false", "fields" : [ "available" ] } } ] } }} |
OrderBy |
findByAvailableTrueOrderByNameDesc |
{ "query" : { "bool" : { "must" : [ { "query_string" : { "query" : "true", "fields" : [ "available" ] } } ] } }, "sort":[{"name":{"order":"desc"}}] } |
例如
1 | interface BookRepository extends Repository<Book, String> { |
6.3.3 使用原生High Level REST Client
一些复杂的操作也可以直接使用RestHighLevelClient,直接再bean中注入即可使用
1 |
|